
E-bikes are becoming increasingly popular for traditional bike riders and non-riders alike. And there are so many things to consider when choosing and riding an e-bike, beginning with a basic understanding of what they are and what makes some better for you than others.
As a beginner to e-biking, understanding the benefits, features, and electric components of an e-bike will help you choose the best one for you. And learning how to ride it efficiently will keep you safe and help you maximize the enjoyment you’ll get out of owning an e-bike.
In this article, I’ll guide you through the basics of e-biking so that you’ll be properly prepared even though it’s new to you!
What is an E-Bike?
The term e-bike is short for electric bicycle. E-bikes operate exactly the same as a normal bike but have a motor that powers the wheels as you ride. You can also choose to ride one without any assistance, using it just like a normal bike.
Benefits of an Electric Bike
There are a few different reasons why someone might want to buy an e-bike. Mostly they are used as an alternative to a regular bike, getting someone from one point to another. People want to be able to enjoy riding a bike without struggling up a hill or being too tired to make the distance. Some people use e-bikes to get to their college campus or work without working up a sweat.
E-bikes can also encourage more people to be active. Whether it’s someone recovering from an injury, struggling with their weight, or someone living in a hilly area, having an e-bike can make riding a bike less daunting. This means that people are more likely to ride their bikes and exercise.
Another benefit is that you can carry things on an e-bike that might not be possible for you on a regular bike. Things like shopping bags or children in a bike seat can weigh a bike down and make it harder to pedal. But with the assistance of an e-bike motor, this becomes a real possibility. You can also choose to tow a small trailer.
On top of all those benefits, they’re a cheap alternative to owning a car. Unless you need to travel long distances or transport larger loads, an e-bike might be all you need, and you won’t need to worry about parking.
In terms of how an e-bike actually works, there are two main ways that the motor will assist the rider, which I’ll explain below.
Wondering whether e-bikes are safe? Take a look!
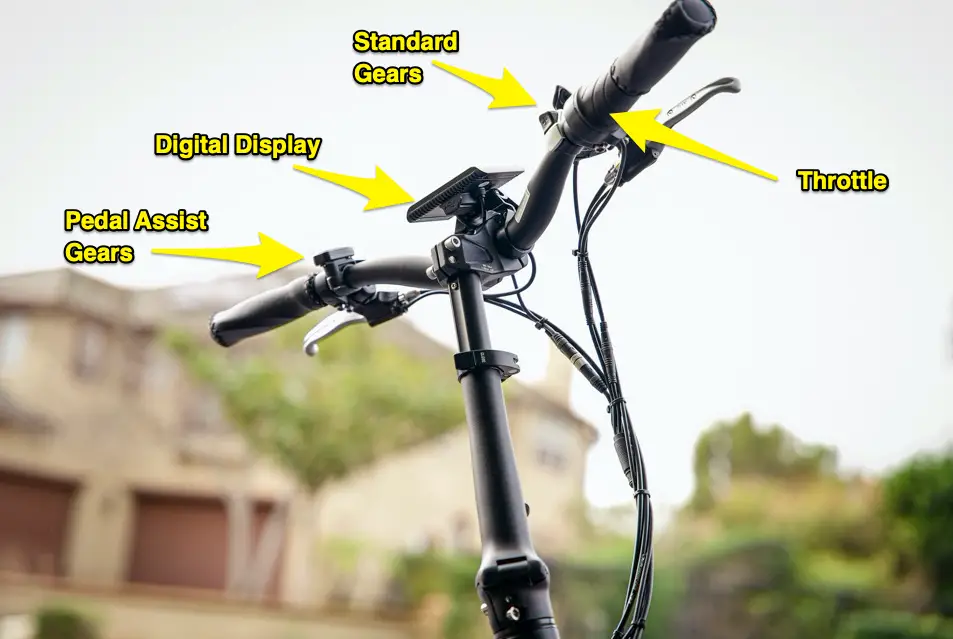
Pedal Assistance
The most common form of an e-bike is the pedal assist bike, also known as a pedelec or ‘pedal electric cycle’. The motor in this e-bike is usually located near the cranks in the center of the frame or in the rear wheelbase (although not always), and will only work when you’re pedaling.
The motor will power the wheels based on how much assistance you choose as well as how fast you pedal. If you select a higher level of pedal assistance, the motor works harder to give you more power. If you are pedaling slowly and easily, the motor will give minimal assistance. You can control if you’d like to have more or less assistance at any given point in time (often just by the push of a button).
Throttle Assistance
The other somewhat less common type of e-bike has a throttle-based motor. This means that your hand controls the motor, like with a motorbike, and that your pedaling plays no part in how the motor runs. You can either use the throttle while you are pedaling to give you extra power, or you can use it by itself to move the bike without pedaling.
These motors are usually found on one of the two-wheel hubs. They can either be built-in, which is the case if it is a dedicated e-bike, or can be retrofitted. Retrofitting a motor and throttle means you can convert a normal bike into an e-bike.
Learn more about the throttle and pedal assist features:
How to Ride an E-Bike Without Pedaling
Classification System
When purchasing an e-bike in several states in the USA, there are three classes to choose from, based on the type of motor and how fast it can go.
- Class 1: Pedal assist with a top speed of 20mph
- Class 2: Throttle assist with a top speed of 20mph
- Class 3: Pedal assist with a top speed of 28mph
Some US brand manufacturers will incorporate a throttle into their class 1 or class 3 e-bikes. But to adhere to the law, the power in a class 1 e-bike will cut off at 20mph if using the throttle, or when you are using the throttle by itself in class 3 e-bikes. If you are pedaling, however, that same bike motor will continue to give you power until you reach 28mph in a class 3 e-bike.
Other countries and global locations may have similar or very different classification systems.
What are the Components of an E-Bike?
There are many similarities between a normal bike and an e-bike because, as I mentioned before, all e-bikes still function as normal bicycles, but have a few additional features to make them electric.
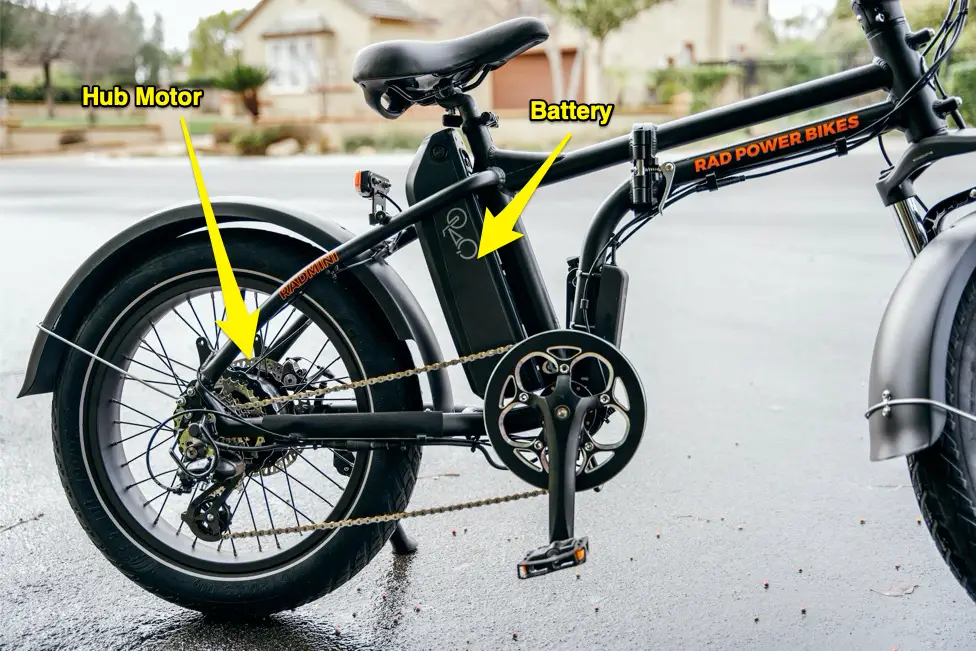
Motor
The motor is the power behind the e-bike. As I mentioned earlier, it can sit near the cranks, known as a mid-drive motor, or in the wheel hubs, known as a hub-drive motor.
Either of these can be found in a pedal assist and throttle assist e-bike, but generally pedal assist bikes will have a mid-drive motor, and throttle assist will have a hub-drive motor.
Motor output is described in watts. Motors that have more watts are more powerful. In the USA, motor output is generally limited to 750W in order to comply with the three-tiered classification system. However, other countries may have lower limitations.
Battery
All e-bikes will have a battery that provides the electrical energy for the motor. This battery is usually placed in such a way that makes it blend in with the rest of the bike. Most commonly these are found on the down tube of the frame, but sometimes they can be hidden in a cargo rack.
Batteries can either be external, integrated, or semi-integrated. External and semi-integrated batteries can be removed to be charged. This also allows you to carry a spare battery if you want to go on a long bike ride. Integrated batteries, however, sit inside the frame and therefore are not designed to be removed. Charging these bikes means bringing the whole bike to the power source.
In general, an e-bike battery will get you 22-50 miles if it is fully charged. It’ll then take 3-6 hours to recharge. This is why some people might opt to carry a spare battery when riding long distances. But just remember, even if the battery dies, you can still use an e-bike like a normal bike. It’ll just be harder to use since e-bikes tend to be quite a bit heavier than standard bikes.
Read this to find out what to do if your e-bike battery dies while riding!
Control Unit
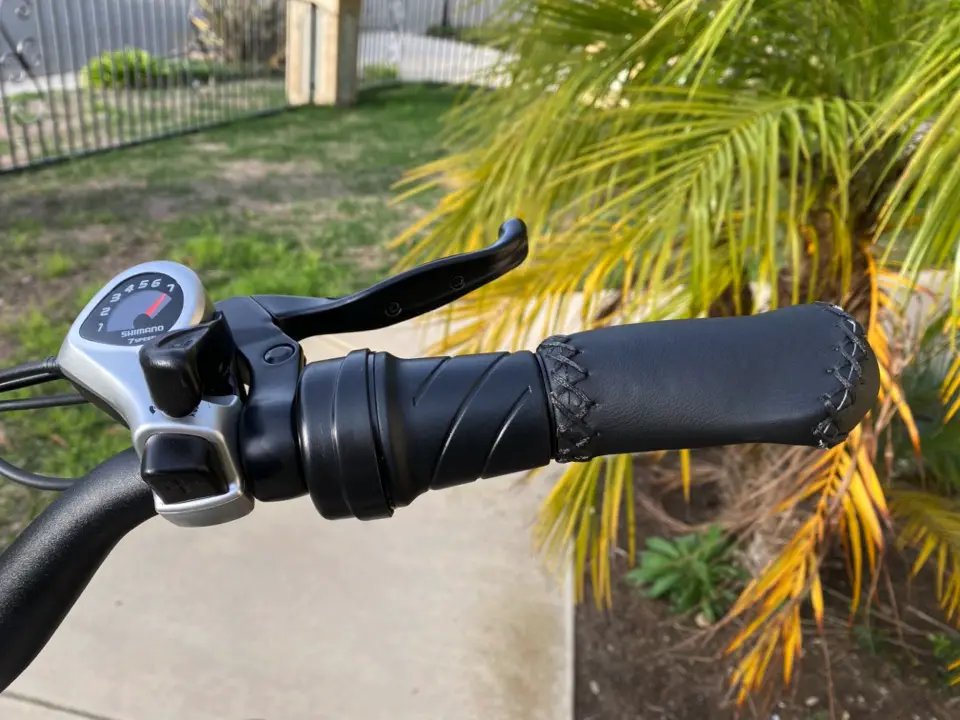
The control unit has a digital display that can show you all the relevant information about the electronics of the e-bike. For example, it can show you how fast you’re going, how much power is left in the battery, how far you’ve ridden, and what level of assistance you are using. Each brand has its own features within its display, but they are almost always found on the handlebars of the bike.
Throttle
The throttle is found on the handlebars of a throttle-assist e-bike. As you twist it, you’ll cycle through varying degrees of assistance from the motor. If you don’t twist the throttle at all, the motor will remain disengaged and you can ride the bike normally, without assistance.
Retro-fitted throttles are usually harder to use because they aren’t built into the handlebars. Instead of a twisting motion, you usually control it with your thumb.
Get an even better understanding of how e-bikes work in our Guide to the Basics.
Sensors
Sensors are built into an e-bike to regulate the motor. For both pedal and throttle-assist e-bikes, there is a sensor that measures your speed. This sensor is designed to cap the top speed of the motor to the legal limit for an e-bike, which is usually 20mph. Once this limit is reached, the motor will disengage, leaving you to pedal unassisted if you want to go faster.
A pedal-assist e-bike will also have other built-in sensors to regulate the motor. The torque sensor measures how hard you are pedaling, whereas the cadence sensor measures how fast you are pedaling. These both will detect how much effort you’re using to pedal and will adjust the motor assistance as required. If you’re putting in more effort, the motor will also increase in power.
Gears
Like any regular bike, most electric ones also have traditional gears that you can shift to make pedaling easier. These are particularly helpful when you want to preserve your battery charge or still need added assistance getting up a hill.
Learn everything about e-bike gears here:
Shifting Gears for Beginners
How to Choose a Good E-Bike
If you’re considering buying an e-bike, there are many things that you need to consider.
A bike shop assistant can help you, but it’s good to know what you’re looking for in an e-bike. There’s also a good chance that you’ll buy an e-bike directly online from hundreds of models, so read this guide to help you choose a good e-bike for your needs.
Function
Know what you want to use the e-bike for.
The first thing you need to consider is what you’re using the bike for. These categories are the same that you would find for a normal bike and are listed below.
- Cruiser E-Bikes: Built for comfort. These are ideal for short trips around the neighborhood or leisurely rides in the park. They usually have added features such as carry baskets or a rear rack for cargo.
- Road E-Bikes: Built for speed. These are ideal for commuting on the road or riding long-distance on paved trails/roads. They usually feature lightweight materials such as carbon fiber frames and improved hydraulic brakes.
- Mountain E-Bikes (eMTBs): Built for adventure. These bikes can withstand different terrains such as rocky slopes or grassy plains. They feature thick wheels, powerful motors, and added suspension
- Utility E-Bikes Built for carrying cargo; even your dog or cat! These are great for delivery bikes as they feature more space for luggage, more stability, and sometimes even another wheel.
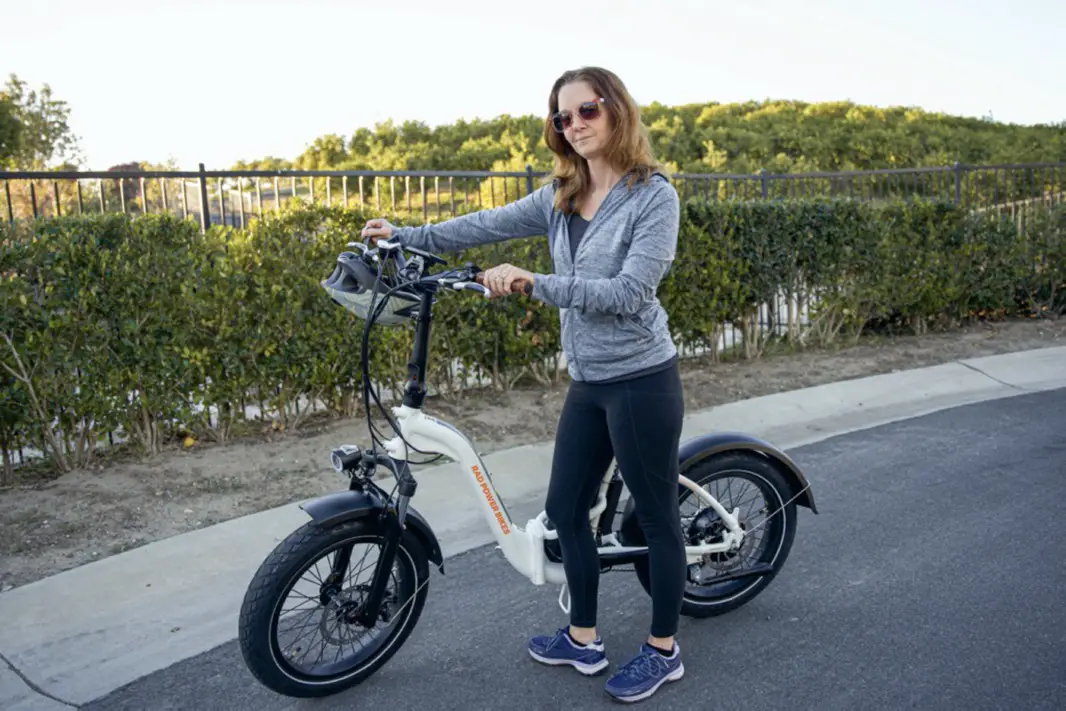
- Folding E-Bikes: Built for portability. These bikes are designed to be smaller-framed and foldable so they can be taken almost anywhere. Commonly, these have been used by those needing to ride public transport or by those with limited space for storage.
Not sure how e-bikes are different than regular bicycles? Read this:
11 Ways E-Bike Are Different From Normal Bikes
Price Range
Many e-bikes priced around $1,000 offer basic but good-quality components.
The price of e-bikes can be anywhere between $500 and $10,000. This price is a combination of the quality of the bicycle itself, the motor, the battery, and the branding. On top of that, you may need a replacement battery every three years or so (if you commute daily), which may cost $500-$800 for a good one.
Cheaper ebike models will range from around $500-$1,000. These are generally steel or aluminum frames with smaller batteries and less efficient motors.
Mid-range e-bikes will cost around $1,000-$3,000. This is the cheapest price you can expect to pay for a decent e-bike.
The high-end e-bikes, from $3,000 onwards, are going to have more gadgets, longer-lasting batteries, durable lightweight frames, and top-of-the-line motors.
It’s up to you to find what features are important to you and the purpose of your e-bike, but just know that it’s hard to find good quality e-bikes below $1,000.
Here’s more help on what to pay for an e-bike:
How much Should I Pay for an Electric Bike?
Thinking of buying a cheap e-bike? Read this first:
Top 12 Things to Know Before Buying a Cheap E-Bike
Type of Sensor
Torque sensors are better but more expensive.
I mentioned briefly the common sensors in an e-bike; the cadence sensor and torque sensor. Ideally, you’ll want to have both sensors built into the bike as this will provide the smoothest assistance to the e-bike. But if you were to choose between the two, torque is overall the cyclist’s preference.
Here are some benefits and disadvantages of both.
| Benefits | Disadvantages | |
| Cadence Sensor | Don’t have to work as hard to activate the motor. Can keep more of a constant speed. Cheaper. | More draining on the battery. Does not feel as natural. |
| Torque Sensor | Uses less battery power. More natural feel. Don’t have to fiddle with the controls as much. | More effort is required to ride. More expensive. |
So, if you want your ride to feel more natural like you’re riding a normal bike (but with a bit of help), make sure to look into an e-bike with a torque sensor. If this doesn’t bother you, a cadence sensor will be fine and should help bring the cost down.
Battery Life
Find an e-bike with a lithium-ion battery that lasts as long as you need.
The weight of a battery is generally an indication of its battery life, with heavier batteries lasting longer. Battery capacity is commonly measured in watt-hours (Wh), which is how many watts can be delivered over the space of an hour. This is typically between 300-1,000Wh in an e-bike.
Basically, batteries with 1,000 watt-hours are going to take you much further than those with 300 watt-hours, but they will also be more expensive.
Because the motor can be used sporadically, the battery life is usually measured in how many miles you can ride on a fully-charged battery. This is known as the range of the battery. On average, a 20mph pedal assist e-bike will use around 15Wh per mile. This means a 300Wh e-bike battery will assist you for about 20 miles, whereas a 1,000Wh e-bike will take you over 60 miles.
However, there are many factors that affect the rate at which an e-bike uses the battery, including the height and weight of the rider, the terrain, the number of hills, the weight of the bike, etc.
So you’ll need to think of how far you want your e-bike to take you and what kind of bike you’ll need. After all, you don’t want a battery that dies while you’re riding it!
If you’re thinking of a mountain bike, you might want to consider a better battery to keep you going through all the hills and rough terrain. An e-bike that is used for small trips around the neighborhood can get away with a smaller and cheaper battery.
Size and Weight
Find a bike that you can swing your leg over and lift on your own.
This is something you can test in the shop, but you’ll need to make sure you can handle the weight of your e-bike and that it’s suitable for your height and weight. If you are purchasing online, be sure to read the height and weight specifications for each model that you look at, as well as read reviews from people your size.
On average, e-bikes weigh between 38 lbs and 70 lbs, with some weighing as much as 89 lbs. This is primarily due to the weight of the frame and battery. This is quite heavy if you consider the average road bike is only 17 lbs.
The height of the seat can be adjusted, as with any bike, but make sure you can easily swing your legs over the frame. Some of the more leisurely e-bikes feature a lower, top tube to make it easier to get on and off the bike (usually called a “Step-Through” or “Low-Step”).
Tires
Look for tubeless tires with low resistance or puncture-resistant tires.
Tires on an e-bike should be different from tires on a regular bike because e-bikes have more weight and gain more speed. This puts more strain on the tires, causing them to wear out or puncture easily.
Having a tire that has low resistance will make the e-bike easier to move and therefore help your battery last longer. Tires with ECE R75 approval have been deemed strong enough to withstand the additional weight and speed of an e-bike.
You’ll also want to look for tires with puncture protection. It’s more difficult to change an e-bike tire than a normal bike tire, so having puncture protection will mean fewer flat tires.
One great (but expensive) brand is Schwalbe. They have tires specifically designed for e-bikes and incorporate tubeless tire technology to prevent flat tires.
Trustworthy Brand Components
There are so many electric bike brands to choose from. Plus, there are many different components on each model of e-bike. Some brands, like Yamaha, make their own bike, motor, and battery. Other e-bikes will combine two or more brands together.
What’s important to know is that finding an ebike with high-quality components (especially gears, batteries, motors, and brakes) makes a big difference. These components include the motor, drivetrain, tires, and brakes. Here is a list of brands to keep an eye out for when looking for reliability.
| Quality Suppliers | |
| Motors | Bosch Brose Shimano |
| Drivetrain Components | Shimano SRAM Rohloff |
| Tires | Schwalbe Maxxis Continental |
| Brakes | Shimano Magura SRAM |
Check out the best e-bike brands for your money!
How to Ride an E-Bike
Riding an e-bike is not as difficult as you might think. If you know how to ride a regular bike, you already know most of what you need to know. But it’s completely understandable if you’re unsure or have some questions before riding for the first time. Hopefully, this will help ease your mind and answer your questions.
Understand the Law
First, you don’t need a special license to ride an e-bike in most places if it meets local requirements. These requirements differ from country to country, and can even be different in some states. Here is a basic outline of the requirements, but I recommend looking up your local laws to confirm.
| Max. Motor Power | Max. Speed (Pedal Assist) | Max. Speed (Throttle Only) | |
| USA | 750 watts | 28mph | 20mph |
| UK/Europe/ Australia | 250watts | 15.5mph (25kmph) | 3.7mph (6kmph) |
Generally, you also won’t need motor registration for an e-bike if it adheres to these regulations.
The U.S. does not require adults to wear a helmet unless they’re using a class 3 e-bike (up to 28mph of assisted pedaling). Other countries, however, will require you to wear a helmet by law. I recommend always wearing a helmet regardless of age or the speed of your e-bike.
There are also minimum age requirements for riding an e-bike. In the United States, a child under the age of 6 years old cannot ride an e-bike at all. Children in some states between 6 and 12 years old may be able to ride, but with restrictions regarding the power of the e-bike. Most states have a minimum age limit of 14-16.
Again, keep in mind that these are general regulations. You need to check the specific laws in your area before you ride. Many states in the U.S. don’t allow kids under 16 to ride an e-bike at all.
Find out where you can ride legally in the US here:
Legal E-Bike Riding in the USA
Riding an E-Bike
There are a few things you might want to know about actually riding an e-bike.
First, as you begin pedaling, you’ll notice the motor kick in after about half a turn of the pedals. However, if you have a throttle e-bike, you can use it to get the motor running.
As you ride, the motor will give you more power when it senses that you are putting in more power. If you stop pedaling, the motor will disengage and your e-bike will eventually come to a stop (but it does take a little longer, so plan ahead for this!). Or you can apply the brakes.
With a throttle-assisted e-bike, the throttle will continue to provide steady power to the e-bike until you ease the pressure. The more you twist it, the faster you will go until you reach the maximum speed. You can still pedal along if you want to get some exercise at the same time.
Beginners: Find out step by step how to use an e-bike:
How to Use an E-bike: Step by Step Instructions
Back to pedal assist bikes… once you are pedaling and the motor is engaged, you can cycle between different levels of assistance. The lowest setting is usually less than 100%, meaning that the motor will be providing the bike with less acceleration than you are.
At 100% assistance, the motor is matching the effort you’re putting into riding the bike. These assistance levels, as I mentioned earlier, can go more than 300%, depending on how much effort you want to put in.
Once the e-bike senses you have reached the top regulated speed, the motor will disengage and you’ll be pedaling unassisted. You can continue to pedal, and even go faster, but the motor will not assist beyond 20mph for class 1 or 2 e-bikes, or 28mph for class 3.
Once you’re ready to stop, simply apply the brakes, which are the levers on each handlebar, until your bike has come to a complete stop. Then you can get off the e-bike and flick the kickstand out to hold your bike up.
Wondering how hard electric bikes are to maintain? Here’s a step-by-step guide!
Riding for the First Time
Here’s a brief step-by-step guide on how to get started on your e-bike.
- Start by charging the battery.
This takes around 3-6 hours, so it’s best to charge it the night before you plan to ride. - Read through the instructions that came with your e-bike.
Familiarize yourself with the buttons and features. - Run through some basic safety checks.
These are listed further down. - While you wait for the battery to charge, try to ride the e-bike without any power.
This will be harder without power because e-bikes are heavy, but it should give you a feel for the bike and how it handles. - Try riding on the lowest pedal assist setting.
This means that you are still doing most of the work. Then you can gradually build up to the highest setting, which can be 300% or more assistance from the motor. - Practice taking off on the e-bike to get a feel for when the power kicks in.
Also, practice coming to a safe stop. Because you will potentially be reaching higher speeds, knowing when and how hard to brake will keep you and others around you, safe. - Choose a wide path to practice riding.
This will give you the opportunity to ride without any obstacles or sharp turns. - Enjoy your new e-bike!
Is it easy to ride an e-bike? Find out here:
12 Riding Tips for Beginners
Safety Checks
Here are a number of checks you can do before riding your e-bike for the first time. You won’t have to do this every time, but it’s a good idea to run through them before your first ride to give you peace of mind, and in case there are any faults that need to be addressed.
- Make sure the bike feels sturdy, particularly the saddle.
If it doesn’t, there may be a screw loose that needs to be tightened with a multi-tool. - Check your battery is locked in.
All batteries come with a key for security purposes. Remove the key and try to take the battery out to make sure it won’t fall out on your ride. - Secure any cargo securely so it cannot move in any direction.
- Stay vigilant to obstacles and pedestrians in your path.
- Wear appropriate safety gear.
This may include a helmet, elbow and knee pads, and even secure footwear. - Check your tires.
You don’t want to pull out for a long ride, only to realize that your tire is flat or slowly deflating from a puncture. - Check your brakes at lower speeds so that you know they are working.
Do this before you reach maximum speeds. - Familiarize yourself with the e-bike’s buttons and console.
You don’t want to be distracted while riding.
Conclusion for Beginner E-Bike Riders
E-biking is an enjoyable and meaningful activity for many, but it’s not as simple as riding a regular bicycle due to the complex nature of the electric components.
When you’re beginning, you’ll have a lot of questions that need to be answered, especially if you are completely new to riding a bike in the first place. And riding an electric bike requires more knowledge and caution than just hopping onto a standard bike. So, I hope this basic beginner’s guide has helped answer any questions you may have about choosing and riding an e-bike.
