Like any helpful technology, parts wear out frequently and need to be replaced. This is no different with an electric bike. So if you need to add a new controller to your electric bike, or are doing a complete e-bike conversion, then you’ll want to find out where a new controller should be located.
The best place for a controller on your electric bike will be where it’s protected from water and weather, doesn’t get too hot, and stays out of the way of pedaling or getting seated on your e-bike.
Read below to find out where your electric bike controller is located and what you need to know about how a controller works before choosing one and installing it.
What Does an Electric Bike Controller Do?
The electric bike controller acts as the brain of a pedal-assisted bike. It coordinates all of the electronic activities of the bike.
So it’s helpful to understand its importance when it comes to how your electric bike works.
How Does the Controller Work?
Generally speaking, the controller takes information from the battery, motor, throttle, and pedal assist system and then returns the correct signal to your system of electronic parts.
For example, if you throttle your e-bike, the controller will collect information from that action and tell the motor how much power to give. Thus, your electric bike moves forward when you twist the throttle.
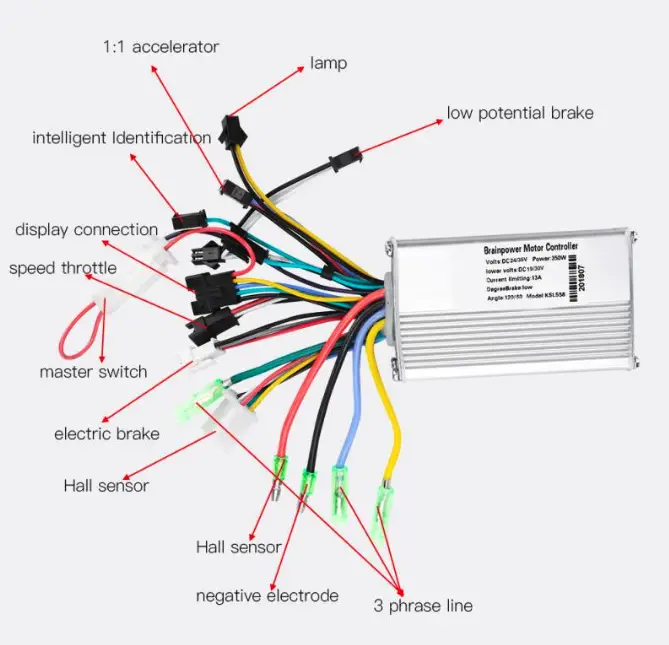
Here’s what a controller typically looks like. You can see all of the different wires that will attach to various features of a motorized bike.
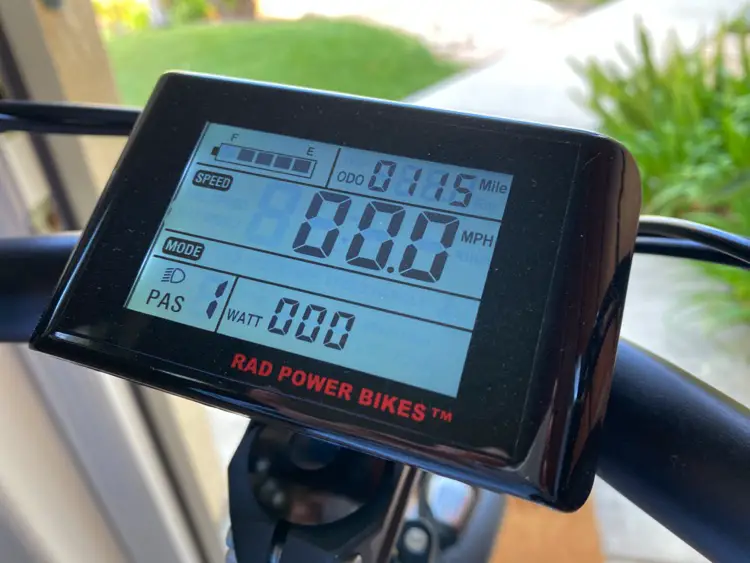
Controller display
The controller is also connected to the display that shows you the battery level, speed, and level of pedal assistance.
If the controller works correctly, you can simply view the controller display to see the results of your riding output. That’ll help you know when to charge the battery, whether you can shifting your gears for assistance, and how fast you’re going.
Where does the controller go on an E-Bike?
In many newer electric bikes, the controller is located on the frame near the battery.
However, if you’re doing an electric bike conversion, the controller can go in a few different places. However, the controller display is typically located in the middle of the handlebars for easy viewing.
Places to install a new controller
Battery bag
Buy a bag to cover your battery and include the controller inside the bag. Uses a piece of foam in between both to keep the controller from overheating because of the battery.
Sitting on top of the battery
I’d suggest still using a foam separator even if it’s not in a battery bag.
In a controller box
This keeps wires safely contained and looks nicer than the silver metal controller. You can mount the box directly to the frame. Attach it either below the seat on the seat post or on the lower part of the frame in front of or behind the battery.
Mount directly to the frame
If you don’t feel the need to use a controller box, then you can mount it directly onto the frame, in the same locations as mentioned above. Basically, you can install the controller anywhere on the frame that stays out of the way while you’re riding.
Watch the video to see where and how to connect the controller:
How to Choose an E-Bike Controller (tips to follow):
The first thing you need to know before purchasing a controller is what type you want, a Sine wave or a Square wave.
A sine wave controller will be quieter, smoother, and have greater motor efficiency.
A square wave controller will work with multiple motors, use power voltage more efficiently, and be better at braking and accelerating suddenly.
Although a square wave controller will be noisier, it will also be less expensive than a sine wave controller.
Here are some other important tips to keep in mind when choosing one.
For an electric bike conversion:
- First, get a controller with a voltage that matches your bike’s battery and motor (24V, 36V, or 48V are typical).
- Buy a battery and controller that match amps and volts at the same time, so you don’t get stuck in the middle of your conversion.
- Make sure the controller you choose is compatible with your motor’s wattage.
- Your battery maximum output current needs to be higher than than the controller (typically 18A, 25A, or 35A).
- Find out whether your motor has hall sensors. If so, then your controller will need to manage hall sensors, typically either by being hall sensor or dual mode compatible.
Replacing a controller on an older e-bike
- Get a new controller that matches the voltage of the controller that was installed on your elecric bike by the manufacturers.
- Compare the price and quality of replacing the controller with the same brand… you’ll be assured it meets the right specifications.
- Get one with an LCD display… it’s worth the extra cost to be able to clearly see the battery level and find out how fast you’re riding, especially if you intend to use it for exercise and fitness.
Best Electric Bike Controllers to Buy (and their cost!)
If you need to purchase a new controller, take a look at the one’s other electric biker’s like:
| Best Electric Bike Controllers on Amazon |
| NBPower Sine Wave Brushless DC Motor Controller **** 1/2 $289 Dilwe Brushless Controller + LCD Display, Rainproof **** $63 Wonvon Motor Brushless Controller + LCD Display, Waterproof **** $57 EBIKELING 500W 1200W 1500W Waterproof **** $58 Cozyel 48V/72V 2000W Brushless Motor Speed Controller **** $70 Alomejor 12V 500W Motor Controller **** 1/2 $22 |
How to Connect an Electric Bike Controller
In general, you should follow the diagram provided with the controller. However, the wire types, colors, and numbers may be different than currently included on your electric bike, especially if you have an advanced controller with a display.
If you’re replacing a controller, your electric bike will dictate how many wires are needed based on the features of your bike. For example, if you have additional features such as a LED headlight (this one from Amazon) or Reverse function, then you’ll need more wires in order to connect them.
Location of controller
To determine the best location to attach your controller to your electric bike, test a variety of spots that could work (as listed previously in this article). Make sure you can get on and off your e-bike and pedal freely without hitting the controller.
You can test each placement by putting the controller in a test spot and wrapping it with a tie or piece of velcro.
You can easily make sure the controller is waterproof by enclosing it in a controller box. Then just mount the box onto the bike’s frame.
Advanced controllers with display
Often, there are more wires found in controllers that come with quality LCD displays.
And, if you buy a controller with an LCD display, you can put the display on the handlebars, right in the middle where you can easily see your speed and battery power remaining.
Again, keep in mind that you may have extra wires that won’t attach to anything if you don’t have as many electronic features on your e-bike or with your conversion kit.
Using a Conversion Kit
Certainly, if you’re considering an electric bike conversion, you can just buy an entire kit. Then you’ll know that your controller will match your motor perfectly.
Conversion kit options
You can get a complete conversion kit but you’ll want to make sure you know what you want (and that you can do it yourself)!
Make sure you do your research on the different types of conversion kits and know what’s involved first.
Find out everything you need to know about conversion kits in the E-Bike Conversion Guide I’ve compiled for you!
There are two main types of conversion kits:
- Standard: Mid-Drive motor kits and Concealed conversion kits
These attach low and centered on your frame which will give you a balanced ride and smooth ride. And, if it’s a concealed kit, you’ll hardly notice it’s there, which makes your electric bike look pretty sleek.
You may wish to choose this type of electric bike kit if you’re a semi-professional rider or place high value in the quality of each bike ride. - All-in-One Electric Wheel Kit
These are popular, easy-to-install kits that simply replace the bike’s wheel with one that contains a hub motor and electric gears.
This is likely the type of conversion kit you’ll want to install if you’re a recreational or beginning rider.
New to e-biking? You might like to read this before you start an electric bike conversion!
