
When buying an e-bike, many people are just thinking about the cost of the bike and which one they want. But it’s also a good idea to pay attention to the ongoing replacement needs of the various parts, especially the electric components.
As with any electric component, your e-bike controller is one of the parts likely to break first. So, you should consider how long your e-bike controller will last and what you’ll have to pay to get a new one.
On average, an electric bike controller will last a minimum of 3-4 years, just like the battery and the motor. You can determine the need to replace the controller by testing it with a multimeter to measure the voltage crossing the terminals.
An electric bike controller is a device that converts human effort into electric power for an electric bike. The electric motor then turns this energy into mechanical motion to drive the wheels of a bicycle. This device can fail and stop working, so it’s important to know how to test your controller in order to prevent being stranded somewhere without your vehicle!
What Does the Controller On an E-Bike Do?
The electric bike controller is the piece of equipment that allows an electric bike to function. It does this by coordinating all aspects of the electric bike, including power from a battery pack, speed control for motorized bikes, and throttle input from the rider.
The most common type of electric bike controller is called a “speed circuit” which uses potentiometers as feedback devices to adjust voltage levels in different parts of the circuit according to how hard you’re pedaling or how fast you want your bike to go.
In case you’re wondering, potentiometers are special resistors that produce varying electrical currents. They’re used in electric bike controllers because they can be adjusted to control voltage levels.
There are two primary parts of the e-bike that controller wiring connects to.
Computer Display
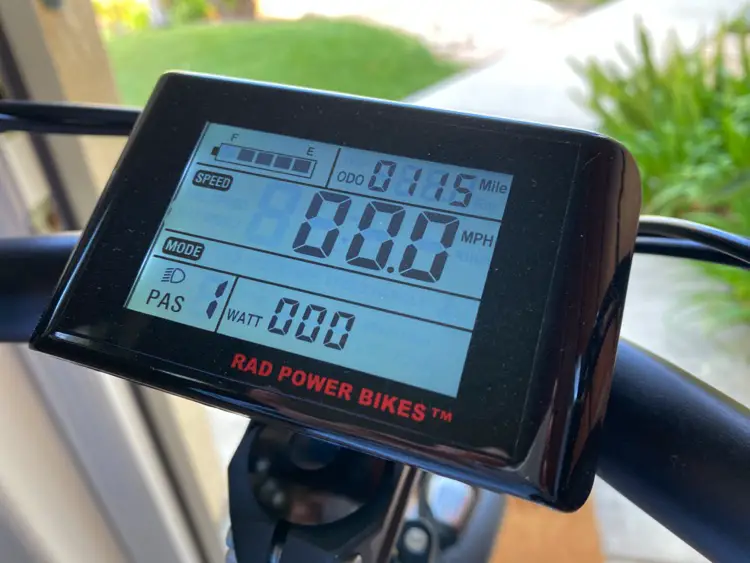
The computer display, typically an LCD screen, is the main interface between the electric bike controller and rider. It communicates what assistance level you have selected or how fast your electric bicycle is going.
The display will usually include menus to make it easy for riders to navigate different options, like selecting a power mode, setting up digital speed readouts in kilometers per hour or miles per hour, and even finding out if there’s enough battery life left before needing to recharge it.
Electronic Switches
These switches turn on the motor and turn it off again. There are usually two types of switches:
-The throttle is a grip on the handlebars that riders twist to turn the motor power on and off (or sometimes it’s a button you press with your thumb).
– The pedal assist sensors, which can be either of two types – cadence or torque sensing. These work when you’re pedaling by turning electric motors on as soon as your foot speeds up, or slows down again at different levels of assistance based on what feels best for each person’s individual cycling habits.
These switches make it easier to use an e-bike than if you had to press start every time before proceeding with your ride. You’ll know how these options are set in advance so they’ll always feel natural without any confusion about whether there’s enough battery life left.
How Long Does an E-Bike Controller Work?
An electric bike controller box should last anywhere from two to five years (so averaging 3-4).
When it comes to electric bike controllers and their longevity, there are a couple of things that will help determine how long they last.
How Often You Ride
For starters, it largely depends on how often you ride your bike. If you’re an occasional rider, your controller could last for many years. But, if you’re a daily rider or like to tour, it may only last one or two years.
Riding and Storage Conditions
Riding and storage conditions can also affect how long it lasts. Heat, freezing temperatures, humidity, flying debris (like sand and dirt), and extreme riding (like electric mountain bike riding) can all affect how long your parts will work, including your controller.
It’s best to keep your e-bike in a dry, cool location averaging 50-60 degrees Fahrenheit, and keep it clean. This will benefit all of the electrical parts that interact with each other.
Find out how to keep your e-bike clean from sand and dirt.
Cost and Quality
Additionally, the cost is a big factor. You’ll get a better quality, more powerful controller for a bigger price tag. If there are lots of hills involved that require stronger pedaling power than usual, it may make sense to spend $300 or more on a new controller because you can expect it to last much longer.
Keep an eye out for malfunctions with the controller marked by flickering lights or clicking noises coming from within the motor unit – these can be indicators that something isn’t right with the system. In cases like these, first take advantage of any remaining warranty provided by most companies before considering buying a new one.
If there it isn’t under warranty, proceed with testing your controller before purchasing a new one.
How to Test My Controller and Display
An electric bike controller helps to power your electric bicycle by converting the energy from a battery into kinetic energy. It is important that you know how to test and maintain your electric bike controller so it will last for years of use.
To test your controller to determine whether it’s working, you need to measure the voltage across the terminals. If you don’t have a multimeter, or you’re not familiar with how to use one, find someone who is and ask them for help.
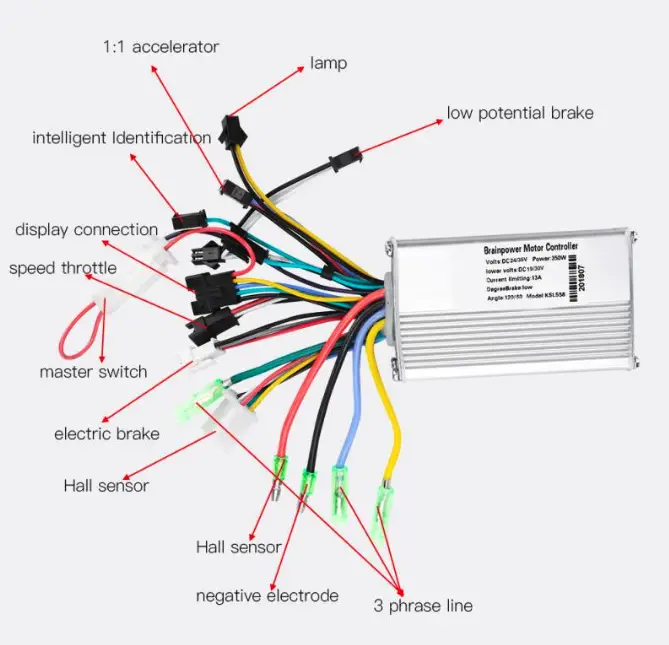
Wiring Diagram for Electric Bike Controller
Step One: Test Hall Sensors
First, test the hall sensors. You can do this by unplugging the motor wires from the controller’s terminals, then plug them back in to see if it turns on. If they turn back on, go to step 2.
Step Two: Test Throttle Sensor
Next, test that your throttle sensor is working by connecting a wire between the signal and ground lines (or black and red) of the throttle connector. This should cause your electric bike to start moving forward when you turn or squeeze your grip handle; if not, go to step three or check with a bike electrician for help troubleshooting.
Checking all these sensors before using your e-bike will ensure that everything is wired correctly so there are no problems later on down the road. It also prevents other damage because now you know what could be causing any malfunctions before they happen!
Step Three: How to Test The Battery and Motor
Testing the battery is also important as it’s what feeds electric power to the controller. So, if your controller isn’t working, it could be due to a bad (or uncharged) battery.
So first, make sure your battery is charged.
Second, you’ll need to disconnect the power connector in order to test it safely.
Third, once disconnected from the bike controller, you can put a voltmeter’s probes on either side of the battery and check for voltage reading; if you get any electric shock or sparks DO NOT TOUCH THE BATTERY!
If there are no problems with this step, then move on to testing that your motor is working. Do this by connecting one probe end of a multimeter (or digital meter) across each red/black wire on your throttle connector while applying pressure to trigger the throttle sensor.
If nothing happens when squeezing the grip handle then something needs fixing!
Take a look at our step by step maintenance guide!
Price for a New Controller
If you test your controller and discover that you need a new one, you’ll want to compare both prices and features. The average cost is from $200 to $500 for a quality one with all of the features you want and a beautiful LCD display.
However, you can get a cheaper controller (around $20-$60) with few settings and options. The benefit to buying a less expensive one is that it’ll give you fewer connections to monitor and therefore less to go wrong. But like any inexpensive part, it may not last as long. And getting a cheap one means that you may not have all of the features you’d like (like fewer levels of pedal assist, and therefore, less speed assistance).
If you need a dual mode controller with lots of settings that requires more monitoring, the costs can be much higher. For most people who are just using their electric bike in order to commute or run errands around town, a $200-$300 controller (Amazon) is usually enough.
In some cases, however, where there are hills involved that require stronger pedaling power than usual, it may make sense to spend $300 or more on a new controller.
Finally, make sure the controller has all of the functions that you want before you buy it. And you’ll want to consider the battery voltage and motor watts so that the controller works with what you’ve already got.
Are you a DIY e-bike builder? You can also buy a new controller within a conversion kit. And, if you’re converting your own bike to an electric bike, it’s recommended that you use the controller that comes with the conversion kit so that everything is made to work well together.
Learn more about e-bike conversion and DIY kits.
List of the Best E-Bike Controllers for the Money
Take a look at some of the best options for electric bike controllers, some cheaper than others. Note that the more expensive ones don’t always come with displays, or if they do, they might not be nice LCD displays. Also, the lower voltage controllers are generally less expensive but mean that you won’t be able to get as much speed and power from them.
Overall, the controller will be priced higher for an electric bike that has a motor with higher wattage and a higher volt battery. So make sure you buy one that works with your e-bike.
Finally, the cost will increase if you’re buying an entire conversion kit to build your own e-bike or if you want a better quality component.
| Brands on Amazon | Star Rating | Price |
| NBPower Sine Wave Brushless DC Motor Controller | **** 1/2 | $289 |
| Dilwe Brushless Controller + LCD Display, Rainproof | **** | $63 |
| Wonvon Motor Brushless Controller + LCD Display, Waterproof | **** | $57 |
| EBIKELING 500W 1200W 1500W Waterproof | **** | $58 |
| Cozyel 48V/72V 2000W Brushless Motor Speed Controller | **** | $70 |
| Alomejor 12V 500W Motor Controller | **** 1/2 | $22 |
Time to buy a new e-bike? Check out our Best E-Bike Companies guide.
How to Program My E-Bike Controller
Programming the electric controller will depend on the brand, but the general idea is to turn it on and make changes by turning the mode switch until you find the desired setting.
If you bought a new controller because your old one no longer works, you’ll need to do a little programming unless you want to keep it on the manufacturer’s default settings.
Programming Using Default Settings
This will vary depending on whether your electric bike controller is using a simple push-button, or if it has LED lights to indicate battery charge status and power selection. You should defer to the manufacturer’s owner’s manual if you’re not sure how to do it.
For example, if you are using an electric bike with Shimano components, after turning your controller on wait for ten seconds and then press and release your grip handle while holding down both buttons (thumb) of the programming port at the same time; let go when done.
Programming New Settings
If you don’t want to use the default settings, you may be able to re-program your controller by following these general steps (again, they may differ depending on the brand of the controller):
– Turn on your electric bike.
– Wait for five seconds and hold the handlebar button with both thumbs down, then release it. This is called programming mode.
– Press the right thumb to increase power or the left thumb to decrease power (the LED lights will tell you which direction). Repeat this until you’re happy with your new settings. You can also press one of the buttons after a delay when in programming mode to set that as default speed instead of using other settings; let go when done.
– To return back to regular use without changing anything else, you can usually turn off the controller and wait five or more seconds before turning it back on.
Conclusion
Electric bike controllers should last for many years if you take care of them and follow the instructions. However, how long it lasts also depends on how often you ride, the conditions in which you ride, and whether you take care of your e-bike in general.
To help keep it in shape, it’s a good idea to test your controller occasionally to make sure it’s giving the maximum output. This will keep you from getting stranded far from home when it suddenly breaks.
